Table of Contents
Introduction
Woo Smart Discounts for WooCommerce is a powerful behavioral discount system designed to increase your WooCommerce store's conversion rates. The plugin displays intelligent time-limited discount popups when visitors spend a configured amount of time browsing your product pages.
What is Woo Smart Discounts?
Woo Smart Discounts is a standalone behavioral discount system with a custom admin panel. It shows a time-limited discount popup when visitors stay on a product page for a configured duration. This strategic approach helps convert hesitant visitors into customers by offering timely incentives at the right moment.
Key Benefits
- Increase Conversions: Convert up to 40% more visitors with behavioral targeting
- Smart Timing: Show popups at the optimal moment based on visitor behavior
- Flexible Targeting: Apply discounts to specific products, categories, or globally
- Real-time Analytics: Track impressions, claims, conversions, and revenue
- Custom Design: Fully customize popup appearance to match your brand
How It Works
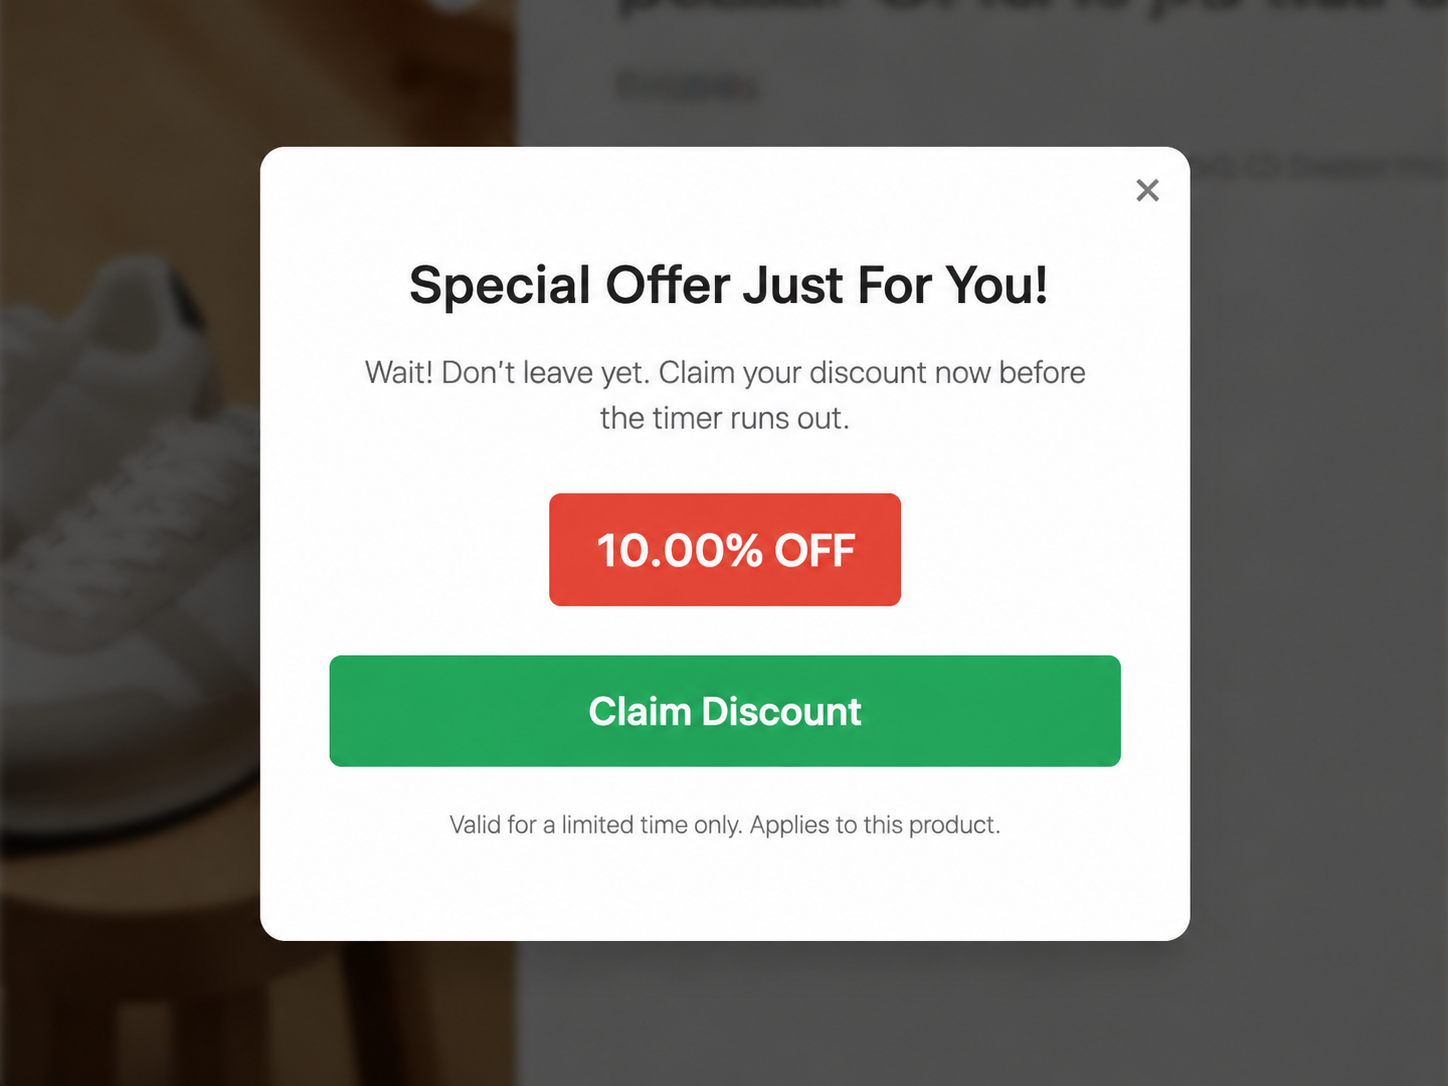
The plugin uses a behavioral targeting approach. When a visitor lands on a product page, a timer starts counting. Once the configured trigger time is reached (e.g., 60 seconds), a discount popup appears offering a time-limited discount. Visitors can claim the discount and proceed to checkout, where the discount is automatically applied.
Example Workflow:
- 1. Visitor lands on a product page
- 2. Plugin starts a 60-second timer
- 3. After 60 seconds, discount popup appears
- 4. Visitor clicks "Claim Discount" button
- 5. Discount is automatically applied at checkout
- 6. Conversion is tracked in analytics
Why Choose Woo Smart Discounts?
Unlike traditional coupon systems that require customers to manually enter codes, Woo Smart Discounts automatically applies discounts at checkout. This frictionless experience increases conversion rates and reduces cart abandonment. The behavioral targeting ensures discounts are shown to engaged visitors who are more likely to convert.
System Requirements
Installation
Step 1: Download the Plugin
Purchase and download the Woo Smart Discounts plugin zip file from our website. The file will be named something like woo-smart-discounts.zip.
Step 2: Prerequisites - Install WooCommerce
Important Requirement
Woo Smart Discounts requires WooCommerce to be installed and activated. If WooCommerce is not active, the plugin will automatically deactivate and show an error message.
Before installing Woo Smart Discounts, ensure you have WooCommerce installed and activated on your WordPress site:
- 1. Go to Plugins → Add New
- 2. Search for "WooCommerce"
- 3. Click "Install Now" on the WooCommerce plugin
- 4. Click "Activate" after installation completes
- 5. Follow the WooCommerce setup wizard if prompted
Step 3: Upload to WordPress
- 1. Log in to your WordPress admin dashboard
- 2. Navigate to Plugins → Add New
- 3. Click the "Upload Plugin" button at the top
- 4. Select the Woo Smart Discounts plugin zip file from your computer
- 5. Click "Install Now"
Step 4: Activate the Plugin
After installation, click the "Activate Plugin" button. The plugin will automatically check if WooCommerce is active. If WooCommerce is not installed or activated, you'll see an error message and the plugin will be deactivated automatically.
Step 5: Activate License or Free Trial
Before creating discount rules, you must activate the plugin with either a Free Trial or a Pro license key. Go to Woo Smart Discounts → Settings and complete one of the two sections below. See the Licensing & Trial section for full details.
Step 6: Access the Dashboard
Navigate to Woo Smart Discounts → Dashboard to view analytics. Use Product Rules to create discounts and Settings to manage license and popup design.
Success
The plugin is now ready to use! Database tables have been automatically created during activation.
Licensing & Trial
Woo Smart Discounts uses server-side license verification. Your WordPress site must be connected to our licensing server with either a free trial email or a Pro license key. Without an active trial or license, the plugin will not run on the storefront and admin features will be locked.
Where to Activate
Go to WordPress Admin → Woo Smart Discounts → Settings. You will see two separate sections:
- Free Trial — for trial users (email only)
- Pro Plan License — for paid customers (license key)
Option A: Free Trial
Start a free trial from our website, then connect it to your WordPress store:
- 1. Visit our website and register for the Free Trial using your email address
- 2. In WordPress, go to Woo Smart Discounts → Settings → Free Trial
- 3. Enter the same email you used on our website
- 4. Click Verify Trial to check status, then Save Trial Email
Status messages (Free Trial section):
- • Free Trial active until [date] — trial is working
- • Free trial expired on [date] — trial ended; upgrade to Pro
- • Enter your trial email to activate the free trial — no email saved yet
Option B: Pro Plan License
After purchasing Pro on our website, activate your license in WordPress:
- 1. Purchase the Pro plan on our website and copy your license key
- 2. Go to Woo Smart Discounts → Settings → Pro Plan License
- 3. Paste your license key in the License Key field
- 4. Click Verify License, then Save License
Status messages (Pro Plan section):
- • Pro license active — full access unlocked
- • Invalid license key — key is wrong or deactivated
- • Enter your Pro license key after purchase — no key saved yet
What Happens When Trial Expires?
When your free trial expires and you do not have a valid Pro license:
- Product Rules locked — you cannot add, edit, delete, or activate/deactivate rules
- Frontend disabled — discount popups will not appear on product pages
- Existing rules paused — rules list shows "Paused — License expired — not running on shop"
- Discounts stop applying — no discounts at checkout
Important: Free Trial and Pro Plan are checked independently. If you have a valid Pro license, the plugin works even after your trial expires. To test trial expiry, make sure the Pro license key field is empty and saved.
Admin Menu Overview
Verification & Security
- License status is verified against our server — not stored locally only
- Status is re-checked daily via WP-Cron and on admin actions
- Each site domain is validated during verification
- Use Verify Trial or Verify License before saving to confirm status
Payment Methods
All payments on our website are processed securely through Paddle — a trusted global payment platform. Paddle handles card details, wallets, and PayPal so your payment information stays encrypted and secure. You do not pay inside the WordPress plugin; payment happens on our website first, then you connect your account to WordPress.
Supported Payment Methods
Google Pay
Fast checkout on supported Android devices and Chrome browsers.
Apple Pay
One-tap payment on Safari, iPhone, iPad, and Mac when Apple Pay is set up.
PayPal
Pay with your PayPal balance or linked bank/card through Paddle checkout.
Credit / Debit Card
Visa, Mastercard, and other major cards via Paddle's secure card form.
Note: Google Pay and Apple Pay only appear when your device and browser support them. If they are unavailable, use PayPal or Card instead.
Before You Pay
- 1. Create an account on our website (Sign Up) or Log In if you already have one
- 2. Go to the Pricing section and choose Free Trial or Pro
- 3. The secure payment window opens — enter your email and select your country
- 4. Click your preferred payment method — Paddle checkout opens as an overlay
- 5. Complete payment — your trial or license is activated automatically
Free Trial Payment ($0)
The Free Trial plan costs $0. When you click Start Free Trial:
- The same payment screen opens with Google Pay, Apple Pay, PayPal, and Card options
- Click a payment method to open the Paddle checkout overlay (used to verify your payment details for the trial)
- Alternatively, submit the form to start the trial directly when available
- Your trial period begins (default: 14 days) — full plugin access during this time
- No automatic charge when the trial ends — you must manually upgrade to Pro
After Free Trial: Go to My Account on our website to see trial status. Then in WordPress go to Woo Smart Discounts → Settings → Free Trial and enter the same email you used on our website.
Pro Plan Payment (Paid)
When you purchase the Pro plan:
- Currency: Switch between USD ($) and INR (₹) on the pricing page
- Domain quantity: Select how many website domains you need (each domain gets a license)
- Payment required: You must select a payment method (Google Pay, Apple Pay, PayPal, or Card)
- Paddle checkout: Complete payment in the Paddle overlay
- License key: Generated automatically after successful payment
- Lifetime access: Pro is a one-time purchase — no monthly subscription
After Pro Purchase: Open My Account on our website to copy your License Key. In WordPress go to Woo Smart Discounts → Settings → Pro Plan License, paste the key, click Verify License, then Save License.
My Account & Payment History
After logging in, open My Account from the website header to view:
- Trial status — active trial days remaining or expired notice
- License key — your Pro license key (after paid purchase)
- Activated domain — which WordPress site is linked to your license
- Payment History — list of trial and paid transactions with date, amount, and payment method
- Upgrade to Pro — button to purchase when trial expires
Payment Flow Diagram
- Website: Sign Up / Log In → Pricing → Choose Plan → Select Payment Method → Paddle Checkout → Success
- My Account: View License Key (Pro) or Trial Email → Copy details
- WordPress: Woo Smart Discounts → Settings → Enter Email or License Key → Verify → Save
- Store: Create Product Rules → Discount popups work on your shop
Troubleshooting Payments
"Paddle is not configured" or payment won't open
The website administrator must configure Paddle keys (Client Token, API Key, Price ID) in the admin panel. Contact support if you see this message on the live site.
Google Pay / Apple Pay not showing
These wallets only work on compatible devices and browsers. Use Card or PayPal as an alternative — they work on all devices.
Payment succeeded but plugin not active in WordPress
Copy your license key or trial email from My Account and enter it in Woo Smart Discounts → Settings. Click Verify, then Save.
Trial expired — how to pay for Pro?
Log in to our website → My Account → click Upgrade to Pro → complete payment with any supported method → use the new license key in WordPress.
Getting Started
Step 0: Activate Trial or License
Before creating rules, activate the plugin in Woo Smart Discounts → Settings:
- Free Trial: Enter your website trial email → Verify Trial → Save Trial Email
- Pro Plan: Enter license key → Verify License → Save License
Note: If your trial has expired and you have no Pro license, Product Rules and the storefront popup will be locked until you upgrade.
Your First Discount Rule
Let's create your first discount rule to see how the plugin works.
-
1.
Navigate to Add New Rule
Go to Woo Smart Discounts → Product Rules → Add New
-
2.
Configure Target
Select "All Products" for your first rule to apply it globally
-
3.
Set Trigger Time
Enter 60 seconds (1 minute) as the trigger time
-
4.
Configure Discount
Select "Percentage" and enter 20 as the discount value
-
5.
Save the Rule
Click "Save Rule" to activate it
Testing Your Rule
To test your new rule:
- 1. Open an incognito/private browser window
- 2. Navigate to any product page on your store
- 3. Wait for 60 seconds on the page
- 4. The discount popup should appear
- 5. Click "Claim Discount" and proceed to checkout to verify the discount is applied
Success!
Congratulations! You've created your first discount rule. Now you can customize it further or create additional rules.
Features
Core Features
Smart Time Triggers
Display discount popups after visitors spend a configured time on product pages. Set trigger times from 10 seconds to several minutes.
Flexible Targeting
Apply rules to specific products, entire categories, or globally with priority override system for maximum flexibility.
Advanced Scheduling
Set date ranges, specific days of week, and time windows. Use quick presets for weekends, weekdays, and business hours.
Real-time Analytics
Track total impressions, claims, conversions, revenue, and top performing products in real-time with detailed reports.
Second Tier Offers
Configure backup offers for visitors who close the first popup. Set different discounts and re-trigger delays.
Custom Popup Design
Fully customize popup appearance with colors, fonts, layout, and branding. Add your logo for a professional look.
Technical Features
- WooCommerce HPOS (High-Performance Order Storage) compatible
- Session management to prevent popup spam
- Automatic cart integration with discount application
- Clean code with no conflicts with other plugins
- Mobile-responsive popup design
- Server-side license verification (Free Trial + Pro Plan)
- Performance optimized with minimal page load impact
Plugin Settings
Go to Woo Smart Discounts → Settings to manage licensing and global plugin options. Settings are organized into separate sections.
Free Trial Section
- Account Email: Same email used on our website to start the free trial
- Verify Trial: Checks trial status with our server without saving
- Save Trial Email: Saves the email to your WordPress site
Pro Plan License Section
- License Key: Your Pro license key from our website after purchase
- Verify License: Validates the key with our server
- Save License: Saves the license key to your WordPress site
General Settings
- Enable Plugin Globally: Plugin is active; individual rules are controlled in Product Rules
- Discount Applied Message: Text shown on the product page when a discount is active (e.g. "Special Offer Applied!")
Popup Design
Customize the discount popup appearance with a live preview:
- Background Color — popup panel background
- Text Color — main text color
- Button Color — "Claim Discount" button background
- Button Text Color — button label color
- Badge Color — discount badge (e.g. "20% OFF")
- Border Radius — rounded corners in pixels
- Font Family — Theme Default, Arial, Georgia, Inter, or Roboto
- Logo / Image URL — optional logo at top of popup (upload supported)
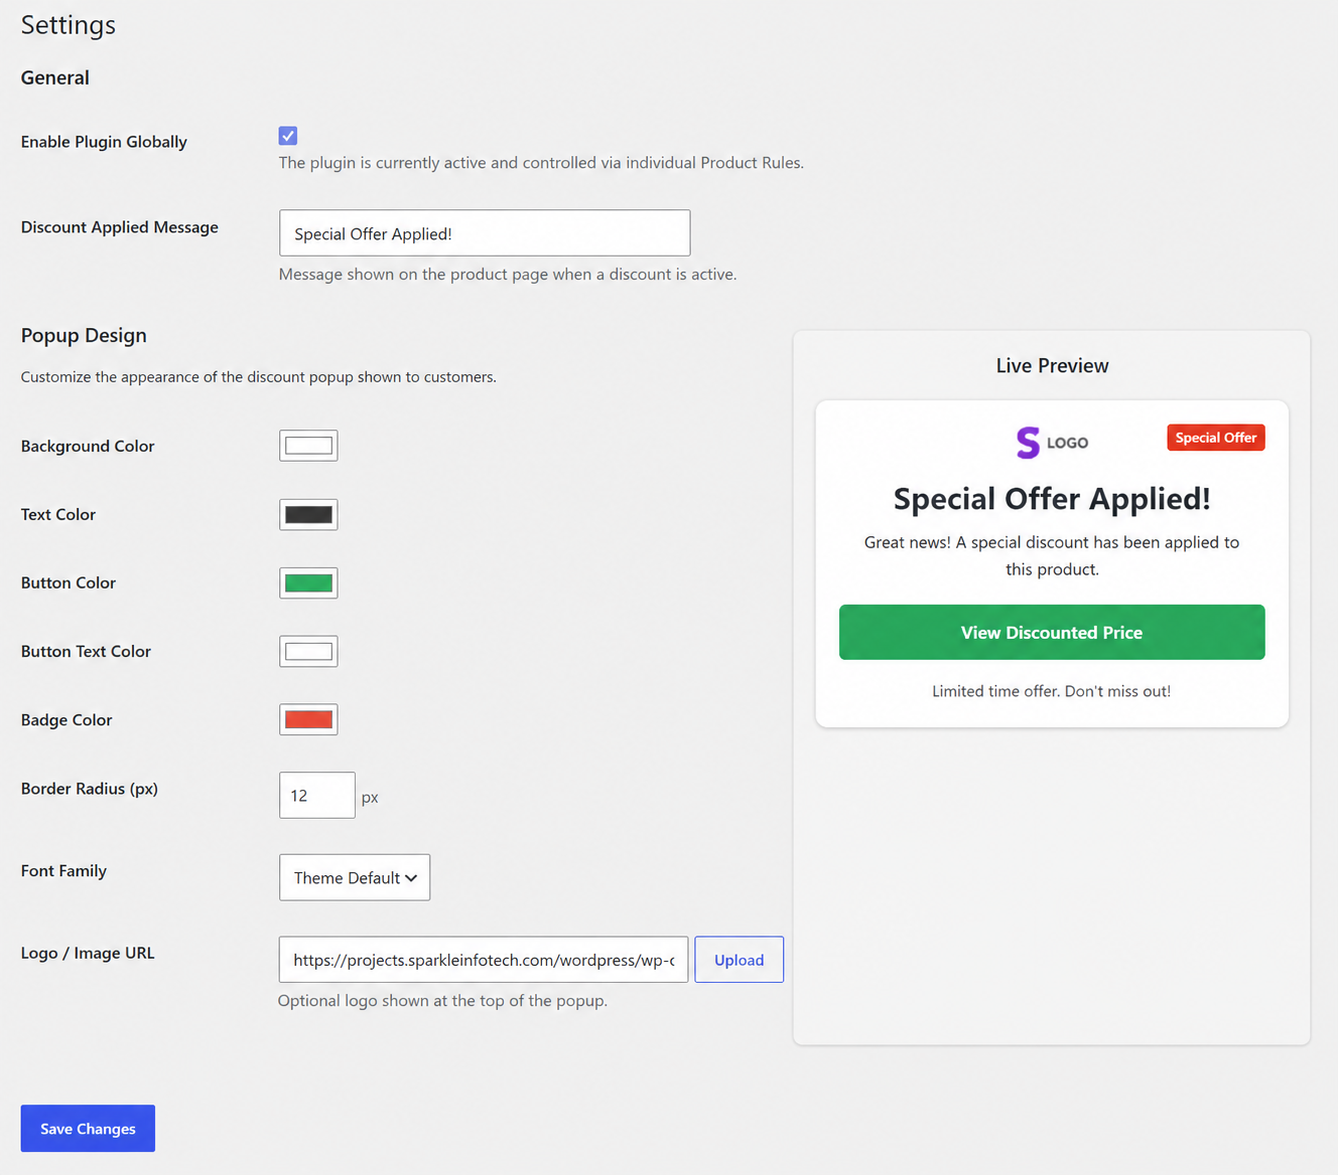
Locked settings: When your trial is expired or license is inactive, General and Popup settings become read-only until you activate a valid trial or Pro license.
Rule Configuration
Complete Rule Settings
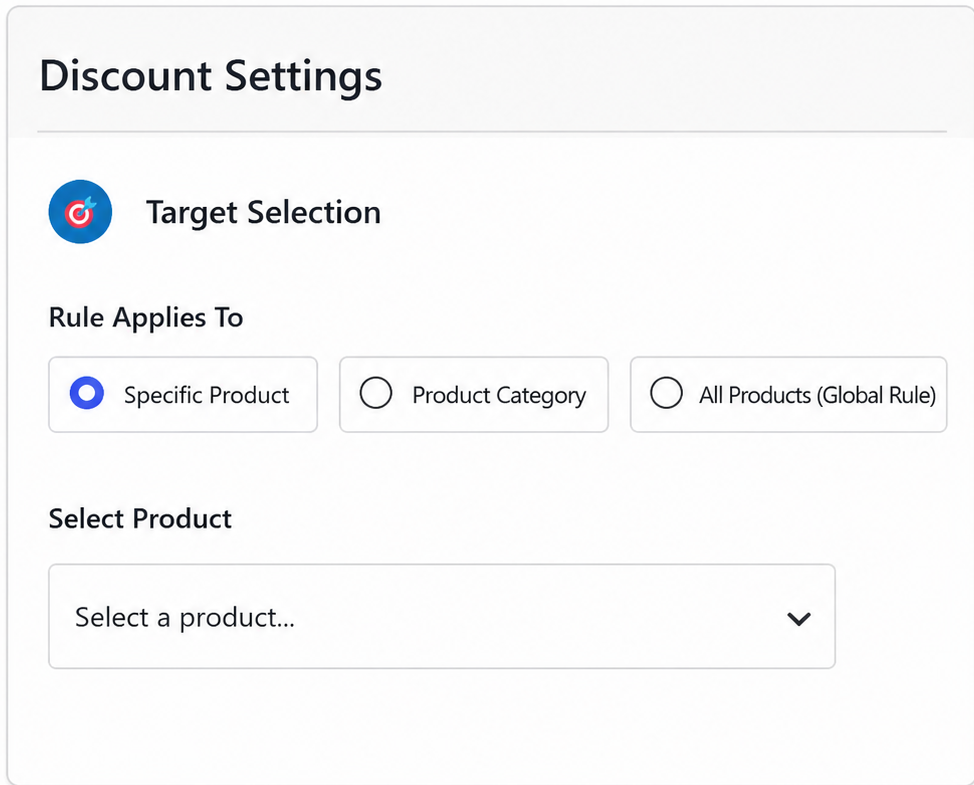
Step 1: Target Selection
Choose where to apply your discount rule:
- Specific Product: Apply to individual products (highest priority)
- Product Category: Apply to entire product categories (medium priority)
- All Products (Global): Apply to all products globally (lowest priority)
Step 2: Rule Status
Enable or disable the rule:
- Enable this rule: Check the box to activate the discount rule
- Disable this rule: Uncheck to deactivate without deleting
Step 3: Schedule (Optional)
Restrict the rule to specific dates, days, or times:
- Enable Schedule: Check to activate scheduling options
- Quick Presets: Choose from Weekends Only, Weekdays Only, or Business Hours
- Date Range: Set start and end dates for the promotion
- Days of Week: Select specific days (Sunday through Saturday)
- Time Range: Set start and end times for daily activation

Step 4: Timing Settings
Configure when and how the popup appears:
- Trigger Time (Seconds): Time visitor must spend on page before popup appears (recommended: 30-90 seconds)
- Discount Duration (Seconds): How long the discount is valid after claiming (countdown timer value)
- Re-trigger Delay (Seconds): How long to wait before showing popup again if user closes it
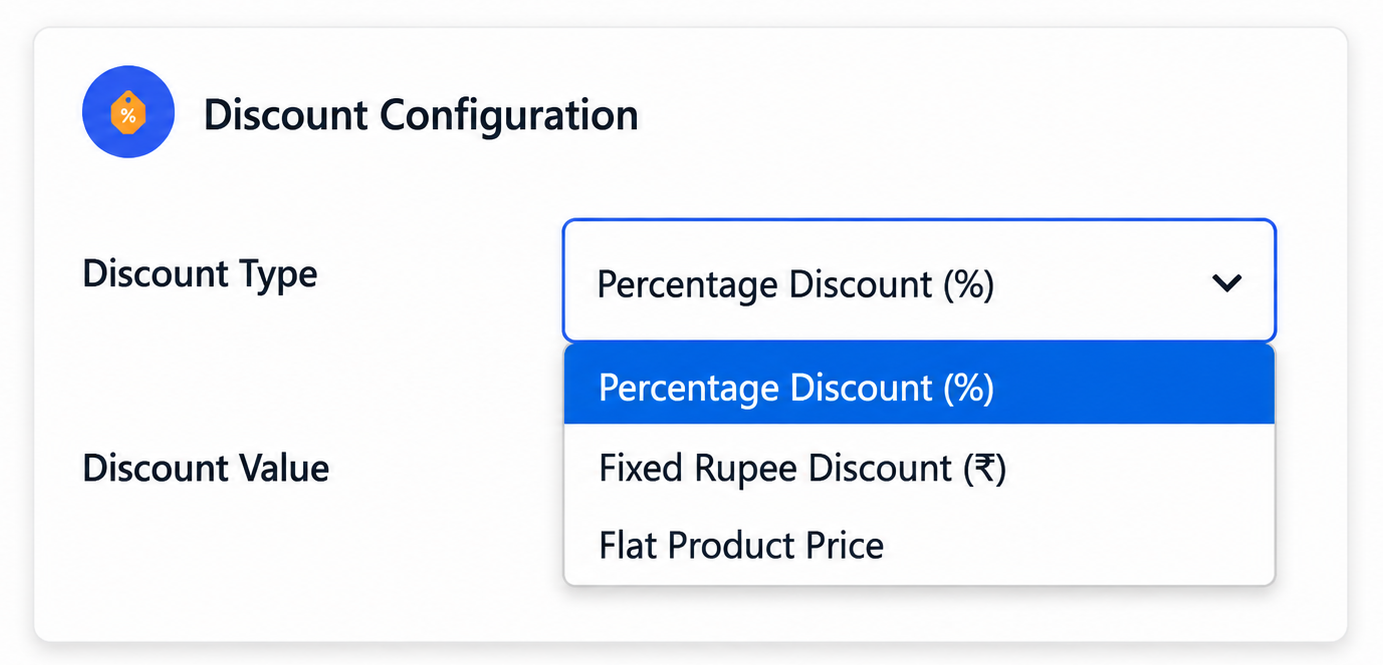
Step 5: Discount Configuration
Set the discount type and value:
- Percentage Discount (%): Discount as a percentage (e.g., 20 for 20% off)
- Fixed Rupees Discount (₹): Fixed amount discount in rupees
- Flat Product Price: Set a fixed price for the product
- Discount Value: Enter the numeric value based on selected type
Step 6: Popup Content
Customize the popup message:
- Popup Heading: Main headline text (default: "Special Offer Just For You!")
- Popup Message: Detailed message with formatting options (default: "Wait! Don't leave yet...")

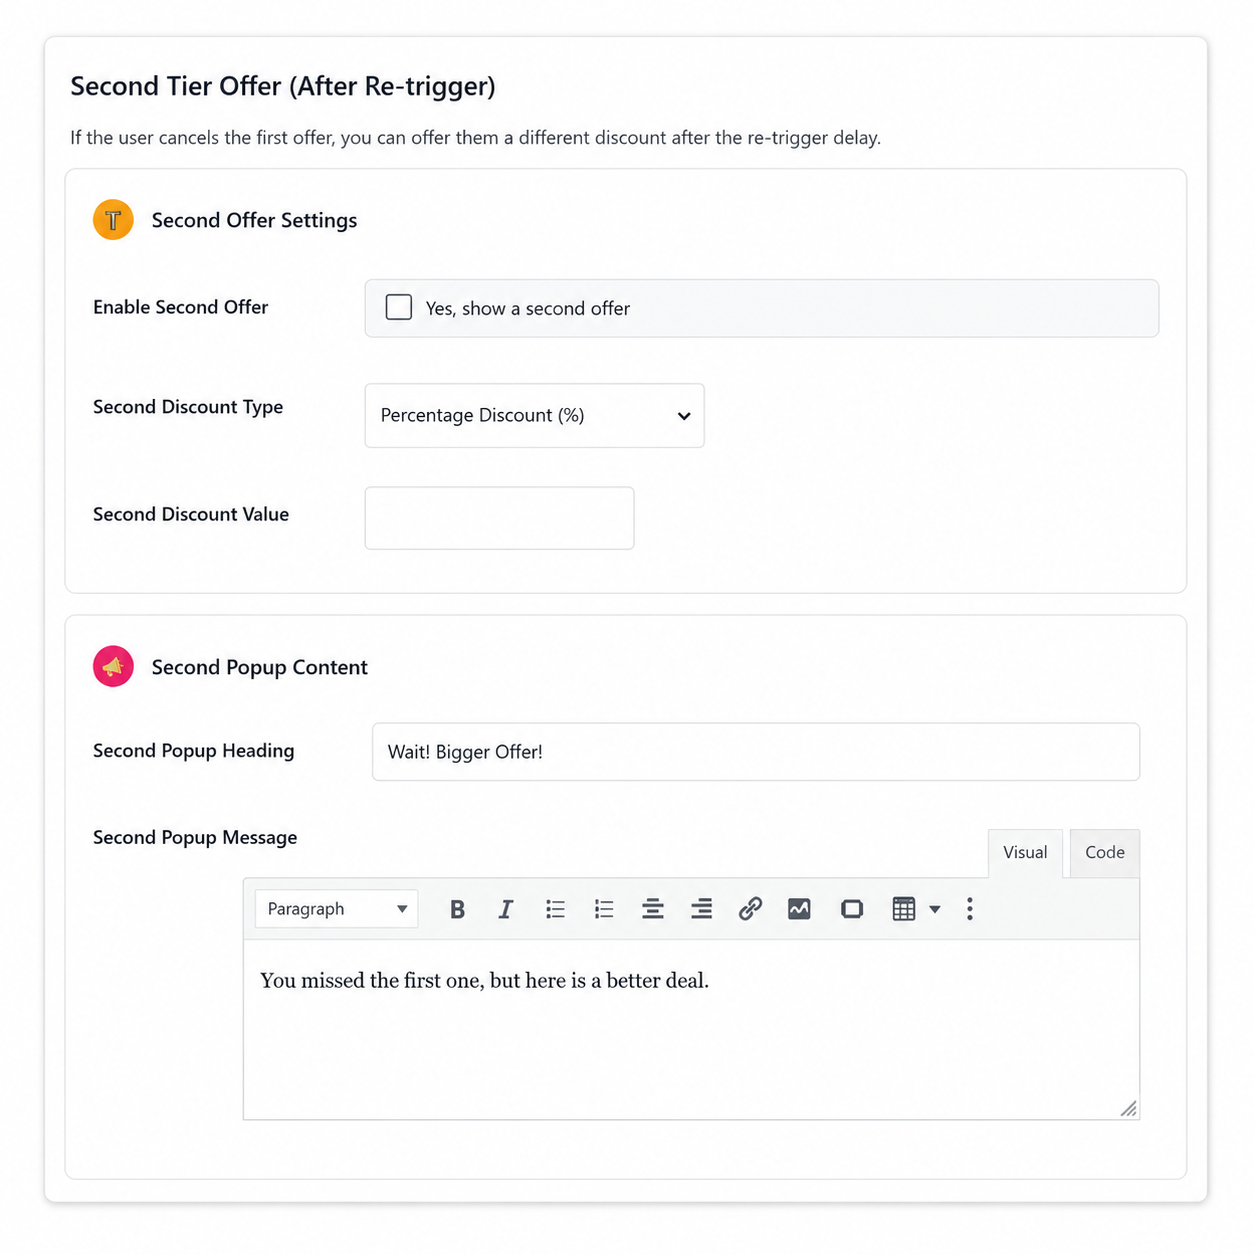
Step 7: Second Tier Offer (Optional)
Configure a backup offer for visitors who close the first popup:
- Enable Second Offer: Check to activate second tier offer
- Second Discount Type: Choose percentage, fixed, or flat price
- Second Discount Value: Enter the discount amount (often higher than first offer)
- Second Popup Heading: Custom heading for second popup
- Second Popup Message: Custom message for second popup
Creating Discount Rules
Complete Step-by-Step Guide
Note: Product-specific rules have the highest priority and always override category and global rules. If multiple rules exist for the same product, the most recently added rule will be applied.
-
1
Navigate to Add New Rule
Go to Woo Smart Discounts → Product Rules → Add New
This will open the rule creation form with all configuration options.
-
2
Configure Target Selection
Choose one of three target types:
- • Specific Product: Select individual products from dropdown (highest priority)
- • Product Category: Select a category to apply to all products in it (medium priority)
- • All Products (Global): Apply to all products store-wide (lowest priority)
-
3
Set Rule Status
Check "Enable this rule" to activate the discount immediately after saving.
You can disable rules later without deleting them by unchecking this option.
-
4
Configure Schedule (Optional)
Check "Enable Schedule" to restrict the rule to specific times:
- • Quick Preset: Choose Weekends Only, Weekdays Only, or Business Hours (9AM-6PM)
- • Date Range: Set start and end dates for the promotion period
- • Days of Week: Select specific days (Sunday through Saturday checkboxes)
- • Time Range: Set start and end times for daily activation
Leave all schedule options blank to run the rule continuously.
-
5
Set Timing Settings
Configure when the popup appears:
- • Trigger Time (Seconds): Enter time visitor must spend on page (recommended: 30-90 seconds)
- • Discount Duration (Seconds): Enter how long discount is valid after claiming (countdown timer)
- • Re-trigger Delay (Seconds): Enter wait time before showing popup again if user closes it
Example: Trigger Time: 60, Discount Duration: 300, Re-trigger Delay: 300
This means popup appears after 1 minute, discount valid for 5 minutes, and reappears after 5 minutes if closed.
-
6
Configure Discount
Set the discount type and value:
- • Percentage Discount (%): Enter percentage (e.g., 20 for 20% off)
- • Fixed Rupees Discount (₹): Enter fixed amount in rupees (e.g., 100 for ₹100 off)
- • Flat Product Price: Set a fixed price for the product
Enter the Discount Value based on your selected type.
-
7
Customize Popup Content
Personalize the popup message:
- • Popup Heading: Main headline (default: "Special Offer Just For You!")
- • Popup Message: Detailed message with rich text editor (default: "Wait! Don't leave yet...")
Use the rich text editor to add formatting, links, or custom styling to your message.
-
8
Configure Second Tier Offer (Optional)
Set up a backup offer for visitors who close the first popup:
- • Check "Enable Second Offer" to activate
- • Choose Second Discount Type (percentage, fixed, or flat)
- • Enter Second Discount Value (often higher than first offer)
- • Customize Second Popup Heading and Message
Tip: Use a higher discount value for the second offer to incentivize conversion (e.g., First: 15%, Second: 20%)
-
9
Save the Rule
Click the "Save Rule" button at the bottom of the form.
The rule is now active on your store and will start showing popups based on your configuration.
Success! Your discount rule is now live. Visit a product page on your store and wait for the configured trigger time to see the popup in action.
Managing Multiple Rules
When you have multiple discount rules for the same product, you can easily activate or deactivate them without deleting them. This allows you to test different offers or temporarily disable promotions.
How to Activate/Deactivate Rules
- 1. Navigate to Woo Smart Discounts → Product Rules
- 2. You will see a list of all your discount rules with their current status
- 3. Click the "Edit" button next to the rule you want to modify
- 4. Check or uncheck "Enable this rule" to activate or deactivate
- 5. Click "Save Rule" to apply the changes
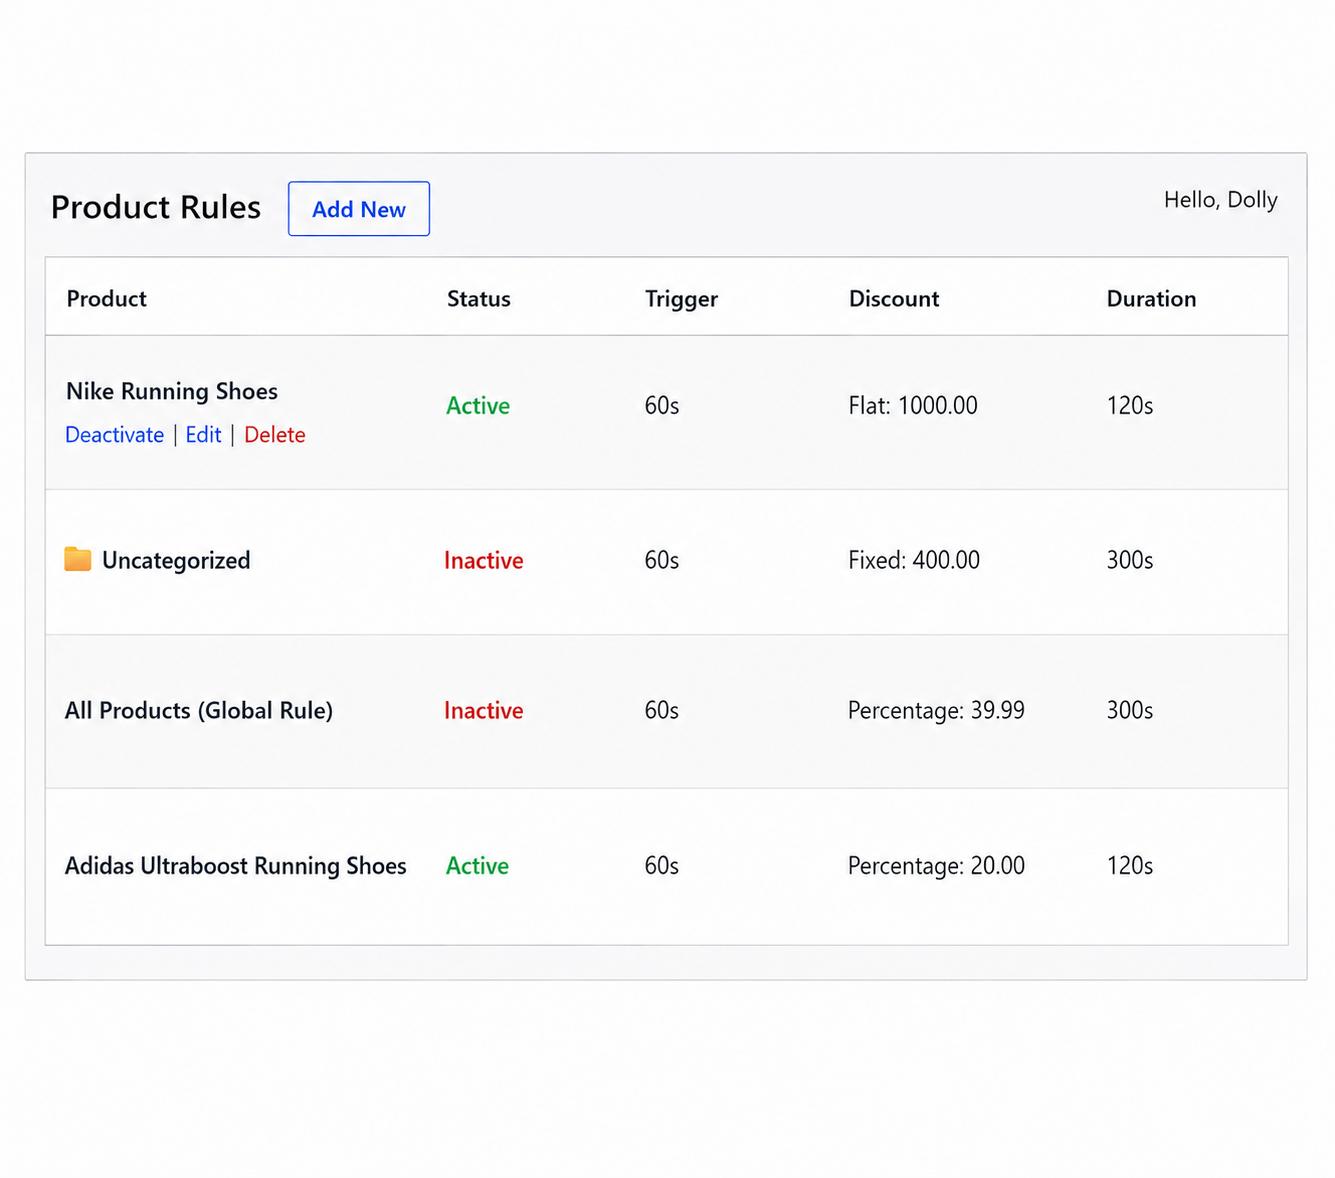
Tip: When multiple rules exist for the same product, only the most recently added active rule will be applied. Use the activate/deactivate feature to control which rule takes effect.
Product Targeting
Target Types Explained
Global Rules
Applies to all products in your store. Lowest priority - can be overridden by category/product specific rules. Best for store-wide promotions.
Category Rules
Applies to all products in selected categories. Medium priority - overrides global rules. Best for category-specific promotions (e.g., Summer Sale on Clothing).
Product-Specific Rules
Applies only to selected products. Highest priority - overrides all other rules. Best for individual product promotions.
Priority Order
- 1. Product-specific rules (highest priority)
- 2. Category rules (medium priority)
- 3. Global rules (lowest priority)
Scheduling
Date Range Scheduling
- Start Date: When the rule becomes active
- End Date: When the rule expires
- Leave blank for no date restrictions
Day of Week Scheduling
Select specific days (e.g., Weekends only). Useful for limited-time weekly promotions. Can combine with date ranges.
Time Window Scheduling
Set specific hours (e.g., 9 AM - 5 PM). Useful for business hours promotions. Can combine with day and date scheduling.
Quick Presets
- Weekends: Saturday & Sunday
- Weekdays: Monday - Friday
- Business Hours: 9 AM - 5 PM
- After Hours: 5 PM - 9 AM
Popup Customization
Design Options
Colors
- Background Color: Popup background
- Overlay Color: Background overlay
- Button Color: CTA button color
- Text Color: Main text color
- Heading Color: Heading text color
Typography
- Font Family: Choose from available fonts
- Font Size: Adjust text size
- Font Weight: Normal, bold, etc.
Layout
- Border Radius: Rounded corners
- Padding: Internal spacing
- Shadow: Drop shadow effect
Content
- Heading Text: Main headline
- Description Text: Subheading or description
- Button Text: CTA button label
- Logo: Upload your brand logo
Best Practices
- Use colors that match your brand
- Keep text concise and compelling
- Use clear, action-oriented button text
- Test different designs to optimize conversions
Second Tier Offers
What Are Second Tier Offers?
When a visitor closes the first discount popup, you can show a second offer after a delay. This helps recover abandoning visitors who weren't convinced by the first offer.
Configuration
- Enable Second Tier: Toggle "Enable Second Tier Offer" to ON
- Set Re-trigger Delay: Time in seconds before showing second popup (recommended: 30-60 seconds)
- Configure Second Discount: Can be different from first offer (often a higher discount)
- Customize Second Popup: Separate design options for second popup
Use Cases
First offer: 15% OFF
Second offer: 20% OFF (higher incentive)
First offer: Free Shipping
Second offer: 10% OFF + Free Shipping
Analytics Dashboard
Metrics Tracked
Impressions
Number of times the popup was displayed. Helps measure visibility.
Claims
Number of times visitors clicked the discount button. Indicates interest level.
Conversions
Number of completed purchases using the discount. Measures actual revenue impact.
Revenue
Total revenue generated from discounted orders. Shows financial impact.
Viewing Analytics
- Go to Woo Smart Discounts → Dashboard
- Select date range (Today, Yesterday, Last 7 Days, Last 30 Days, Custom)
- View metrics for each rule
- Export data if needed
Using Analytics to Optimize
- High Impressions, Low Claims: Improve popup design or offer value
- High Claims, Low Conversions: Improve checkout flow or offer terms
- Low Impressions: Increase trigger time or expand targeting
FAQ
What payment methods are accepted?
We accept Google Pay, Apple Pay, PayPal, and Credit/Debit Cards (Visa, Mastercard) through Paddle. Payments are made on our website, not inside WordPress.
Is the Free Trial really free?
Yes — the Free Trial costs $0. You may be asked to complete a secure Paddle checkout to verify payment details. Your trial does not auto-convert to a paid plan; you must manually upgrade to Pro when ready.
Where do I find my license key after payment?
Log in to our website and open My Account. Your Pro license key and payment history are shown there. Copy the license key into WordPress under Woo Smart Discounts → Settings → Pro Plan License.
Can I pay in Indian Rupees (INR)?
Yes. On the Pro plan pricing section, switch the currency toggle to INR (₹) before checkout. Paddle processes the payment in your selected currency.
What happens when my free trial expires?
Product Rules become read-only (no edit/add/delete), existing rules show as "Paused", and discount popups stop appearing on your store. Purchase Pro and enter your license key in Settings → Pro Plan License to restore full access.
Do I need both a trial email and a license key?
No. Use either a Free Trial email OR a Pro license key. If you upgrade to Pro, enter your license key in the Pro Plan License section. A valid Pro license works even after your trial expires.
Why does the plugin still work after my trial expired?
If a valid Pro license key is saved in Settings, the plugin remains active. Clear the license key field and click Save License if you only want to use the free trial.
Does this plugin work with all WooCommerce themes?
Yes, Woo Smart Discounts is compatible with all standard WooCommerce themes. The popup is designed to work seamlessly with most theme layouts.
Can I use multiple discount rules simultaneously?
Yes, you can create multiple rules. The priority system ensures the correct rule applies based on product, category, or global targeting.
Will this slow down my site?
No, the plugin is optimized for performance with minimal impact on page load times. The JavaScript is loaded asynchronously and the popup appears only when triggered.
Does the plugin work with WooCommerce HPOS?
Yes, the plugin is fully compatible with WooCommerce High-Performance Order Storage (HPOS).
Can I customize the popup CSS?
Yes, you can add custom CSS through the plugin settings for advanced customization.
Does the plugin work with page builders?
Yes, it works with Elementor, Divi, and other popular page builders without any conflicts.
Support
Getting Help
Email Support
support@woosmartdiscounts.com
Response time: Within 24 hours
Documentation
Visit our documentation for detailed guides
Video Tutorials
Watch step-by-step video tutorials
Premium Support
Pro plan customers receive priority support with faster response times and dedicated assistance.
Reporting Bugs
To report a bug or issue:
- Describe the issue in detail
- Include your WordPress and WooCommerce versions
- Include plugin version
- Provide screenshots if applicable
- Email to support@woosmartdiscounts.com